
- 17rlochhead
- Feb 16
- 2 min read
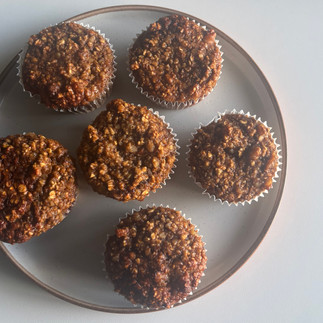
Soft, fluffy banana muffins with a gooey nut butter + berry chia jam centre, crunchy walnuts, and an optional chocolate addition. Naturally sweetened, gluten-free, and perfect for an easy breakfast or snack.

Ingredients (Makes 4–6 muffins)
Muffin Batter
1 ripe banana, mashed
1 large egg (or chia/flax egg for vegan)
3 tbsp milk (dairy or plant-based)
2 tbsp maple syrup or honey
1/2 tsp vanilla extract
1/2 cup gluten-free oat flour
2 tbsp ground almonds
1/2 tsp baking powder
1/4 tsp baking soda
Pinch of salt
1/2 tsp cinnamon (optional)
1/4 cup chopped walnuts
Filling
2 tbsp nut butter (I use peanut)
1/3 cup berries (fresh or frozen)
1 tbsp chia seeds
Optional: 1–2 tsp chocolate chips or a small piece of chocolate per muffin


Method
1. Prepare chia jam
Mash 1/3 cup berries (fresh or frozen) in a saucepan over medium heat
Stir in 1 tsp chia seeds and leave for 10 minutes.
2. Make muffin batter
Preheat oven to 180°C. Line a muffin tin with 4–6 paper cases.
In a bowl, mash the banana and mix with egg, milk, syrup, and vanilla.
In another bowl, whisk together oat flour, ground almonds, baking powder, baking soda, salt, cinnamon, and chopped walnuts.
Fold the dry ingredients into the wet ingredients until just combined.
3. Assemble muffins
Spoon 1 tbsp of batter into each muffin case.
Add 1 tsp of nut butter and 1 tsp of chia jam in the centre of each muffin.
If using, add 1–2 tsp of chocolate chips or a small piece of chocolate on top of the jam.
Cover with 2-3 tbsp of the remaining batter.
4. Bake
Bake for 20-25 minutes, or until a knife inserted into the muffin comes out clean.
Let cool for 5 minutes in the tin, then transfer to a wire rack to cool completely.
Tips & Variations
Nut-free: Use sunflower seed butter and replace ground almonds with extra oat flour. Use seeds or dried fruit instead of chopped walnuts.
Vegan: Use a flax or chia egg and plant-based milk.
Extra sweetness: Drizzle a little maple syrup on top before baking.
Jam options: My favourite to use is blueberry, but any will work well.
Extra crunch: Sprinkle a few walnut pieces on top before baking.
Chocolate addition: Swirl melted chocolate into the top or fold in extra chocolate chips.


These muffins are a great way to use up those overripe bananas sitting in the fruit bowl, and they’re easy to switch up each time with different jams, nut butters, or add-ins. I love experimenting with new variations, and I share other recipes I recommend—plus what else I’ve been making lately—over on Instagram. Come find me at @rubysgfkitchen to find other new recipes and recommendations.
Happy Baking,
Ruby x


